Senin, 10 November 2014

Knock Off No Sew Dining Chairs

I thought this day would NEVER come.  If there has ever been a post where I wanted to do cartwheels across my front yard from revealing the "after" of a challenging makeover, this would be it.  

I have a tendency to bite off more than I can chew.  I see a fixer upper project, my wheels start turning with ideas to make it something amazing, I hit a major snag, I realize that my dreams often exceed my abilities, and I end up shoving it to the bottom of my to-do pile in my garage never to see the light of day again.  (Am I alone in this?  Please tell me you have a when-I-get-the-nerve pile too.)  

But y'all.  Oh my GOSH, I am so ecstatic to show you that my abilities finally caught up to my wild DIY-driven imagination...this time at least.  So I'll save you the time of scrolling to the bottom of this post to see the final reveal:


Just so you know where this big undertaking started, this was how it looked before my upholstery-inexperienced self could get a hold of it.


Well hello, Harvest Gold.  Haven't seen you in a while.  

When I first started envisioning what I wanted in our still very bare dining room, I kept coming back to the same criteria in dining chairs- light linen/canvas, statement-making nailhead trim, and interesting weathered oak legs.  

This one from Restoration Hardware was an absolute dream:

Restoration Hardware Baroque Upholstered Side Chair- $449

And this one from Pottery Barn:

Pottery Barn Calais Chair $349

And this one from Ballard Designs:

Capistrano Dining Chairs - Set of 2
Ballard Designs Capistrano Dining Chair- $429

But there was one minor little problem.  There was no way on God's green earth that my stay-at-home-mom one-income household could shell out $2400 for a set of 6 chairs.  So I swooned and dreamed until I stumbled upon these babies for $20 each on Craigslist. (Which was all the way back in March and then sat in my garage as I tried and failed at this project multiple times.)


They needed some lovin' and a good bit of updating, and they looked nothing like my inspirations.  But they had good bones.  I simply couldn't walk away from them.  So my wonderful dad, who has worked in the furniture business for over 30 years, made the trek with me to pick them up.  

Not only did they have good bones, they were made by American Drew, a very high quality company, and they were incredibly sturdy.  Huge plus!

So here is what we used for our big chair overhaul:
  • Jigsaw
  • Pneumatic staple gun
  • Mouse sander
  • Electric drill
  • Kilz primer
  • Valspar paint in Montpelier Ashlar Gray (flat)
  • Minwax stain in Dark Walnut
  • Several rags
  • 2 1/2" paint brush
  • Sponge brush
  • Mattress egg crate foam 
  • Blue Hawk canvas drop cloth 
  • Spray upholstery adhesive
  • Scissors
  • Staples
  • Sharpie marker
  • Medium sized cardboard box from Lowe's
  • Hot glue gun and glue sticks
  • DAP Contact Cement
  • Dritz Home 5/8 inch nailheads in antique gold
  • Tape measure
  • Pencil
Thankfully, I had a lot of the supplies already on hand in my workshop and could borrow the staple gun.  In the end, I only had to pay for the nailheads, drop cloth, spray adhesive, cardboard, and egg crate foam.  

My final cost: $40 per chair! (Craigslist cost included)  
Even without having a lot of the supplies, it's still a bargain.  My entire set of 6 chairs combined cost way less than even 1 Pottery Barn chair.

Here's what we did:

Since I wanted to upholster the entire backs of the chairs, I knew the curves were going to be tricky.  So Robert and I cut off the finials first.


Bless'er House | Restoration Hardware Knock Off No Sew Dining Chairs

From there, my father-in-law, the woodworking master, gave us a few pointers, and we decided to cut straight edges marked with a level.

Bless'er House | Restoration Hardware Knock Off No Sew Dining Chairs

We avoided cutting into the caning.

Bless'er House | Restoration Hardware Knock Off No Sew Dining Chairs

Then ran the jigsaw over the straight marks.

Bless'er House | Restoration Hardware Knock Off No Sew Dining Chairs

We sanded the edges down for good measure.  (Side note: I love this hardworking man.)

Bless'er House | Restoration Hardware Knock Off No Sew Dining Chairs

Yay! No more tricky curvy top!  From there, I primed the bottom half of the chairs.

Bless'er House | Restoration Hardware Knock Off No Sew Dining Chairs

Then I painted on two coats of Valspar Montpelier Ashlar Gray.

Bless'er House | Restoration Hardware Knock Off No Sew Dining Chairs

Once the paint was dry, I used a sponge brush to put on a coat of the stain.  I let the stain sit for about 10 minutes before wiping it off with a rag, and I worked in sections.

Bless'er House | Restoration Hardware Knock Off No Sew Dining Chairs

And I was left with this rich wood tone with just enough gray peeking through to give it that weathered look.  The wood grain texture on these chairs are amazing!

Bless'er House | Restoration Hardware Knock Off No Sew Dining Chairs

Once the chairs were dried, this was where the hard part began.

By the way, mattress foam toppers are way cheaper than specialty upholstery batting.  And so so comfy!

Bless'er House | Restoration Hardware Knock Off No Sew Dining Chairs

We went ahead and traced the back of the chair onto a piece of cardboard with a Sharpie.  (I promise I did way more work than stand around taking pictures of Robert.)

Bless'er House | Restoration Hardware Knock Off No Sew Dining Chairs

And cut out the traced shape.

Bless'er House | Restoration Hardware Knock Off No Sew Dining Chairs

Using the cardboard as a template, I traced the egg crate foam as the batting.

Bless'er House | Restoration Hardware Knock Off No Sew Dining Chairs

And cut it out with scissors.

Bless'er House | Restoration Hardware Knock Off No Sew Dining Chairs

Then we sprayed the front of the chairback with upholstery adhesive.

Bless'er House | Restoration Hardware Knock Off No Sew Dining Chairs

We pressed the batting onto the adhered chairback.

Bless'er House | Restoration Hardware Knock Off No Sew Dining Chairs

And it was ready for fabric!  (We stapled the drop cloth fabric to the seat while the chairs dried before.)

Bless'er House | Restoration Hardware Knock Off No Sew Dining Chairs

To decide on the amount of drop cloth fabric we needed, we measured the width and height of the chairback and added 4 inches all around to be on the safe side.  Our chairs were 16"x28", so we marked the fabric to be 24"x36" for the front piece.  

Bless'er House | Restoration Hardware Knock Off No Sew Dining Chairs

And cut them out.

Bless'er House | Restoration Hardware Knock Off No Sew Dining Chairs

To create a panel for the back of the chairs, we used the cardboard template and traced around it, leaving an allowance of about 2 inches.  We put these back fabric pieces aside for later.

Bless'er House | Restoration Hardware Knock Off No Sew Dining Chairs

Once we started positioning the front piece of the fabric, it took some time to work with.  We started by stapling the bottom center first.

Bless'er House | Restoration Hardware Knock Off No Sew Dining Chairs

For the sides, I started by folding the bottom flap under to make it straight and stapled it around to the back of the chair.

Bless'er House | Restoration Hardware Knock Off No Sew Dining Chairs

This was definitely a two-person job.  As we worked our way up to staple the sides, I stretched the fabric up while Robert pulled the fabric tightly around the side and stapled, making sure the front was smooth with no puckering.

Bless'er House | Restoration Hardware Knock Off No Sew Dining Chairs

Tricky stuff, I tell ya but it worked.

Bless'er House | Restoration Hardware Knock Off No Sew Dining Chairs

At the top, I was thanking my lucky stars that we went with cutting straight edges.  We started on the sides by folding the corners and cut a little at any places we needed to pull more tightly.  

Bless'er House | Restoration Hardware Knock Off No Sew Dining Chairs

And then we breathed a sigh of relief because the hard part was done!

We went over the staples with a hammer and cut off any excess fabric on the back.

Bless'er House | Restoration Hardware Knock Off No Sew Dining Chairs

To make a back panel, I hot glued the edges of the cardboard cut-out and pulled the fabric tightly, starting at the bottom.

Bless'er House | Restoration Hardware Knock Off No Sew Dining Chairs

For the top I cut the corners and pulled them to glue down.

Bless'er House | Restoration Hardware Knock Off No Sew Dining Chairs

The edges of the panel and the stapled edges of the back of the chair got a good brushing of contact cement.

Bless'er House | Restoration Hardware Knock Off No Sew Dining Chairs

After waiting about 10 minutes, I pressed the panel to the back of the chair.  I applied hot glue under the edges too.

Bless'er House | Restoration Hardware Knock Off No Sew Dining Chairs

Hey, look! An upholstered chair!  Not bad for someone who is making this up as she goes along.  I pressed out the wrinkles afterward too (this photo was a dead giveaway that it needed it).

Bless'er House | Restoration Hardware Knock Off No Sew Dining Chairs

For the nailheads, we used a tape measure and a pencil to mark every 1.75 inches.

Bless'er House | Restoration Hardware Knock Off No Sew Dining Chairs

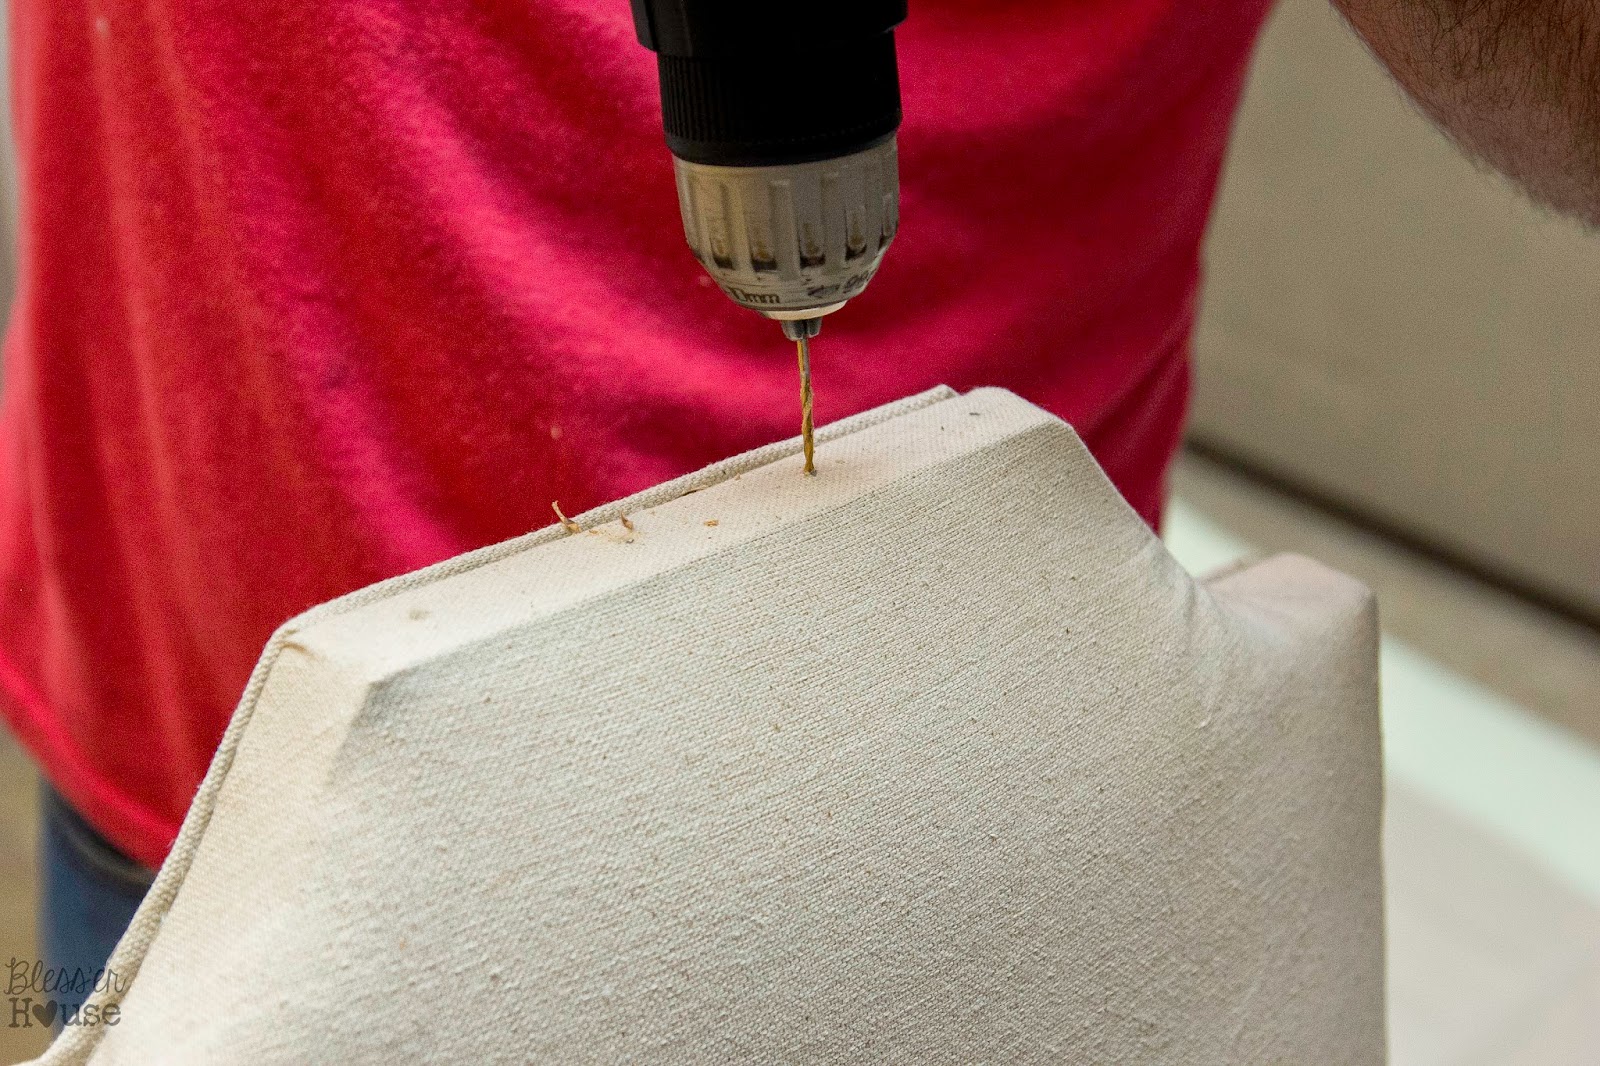
Since the wood of these chairs was so hard, we had to use a small drill bit first.

Bless'er House | Restoration Hardware Knock Off No Sew Dining Chairs

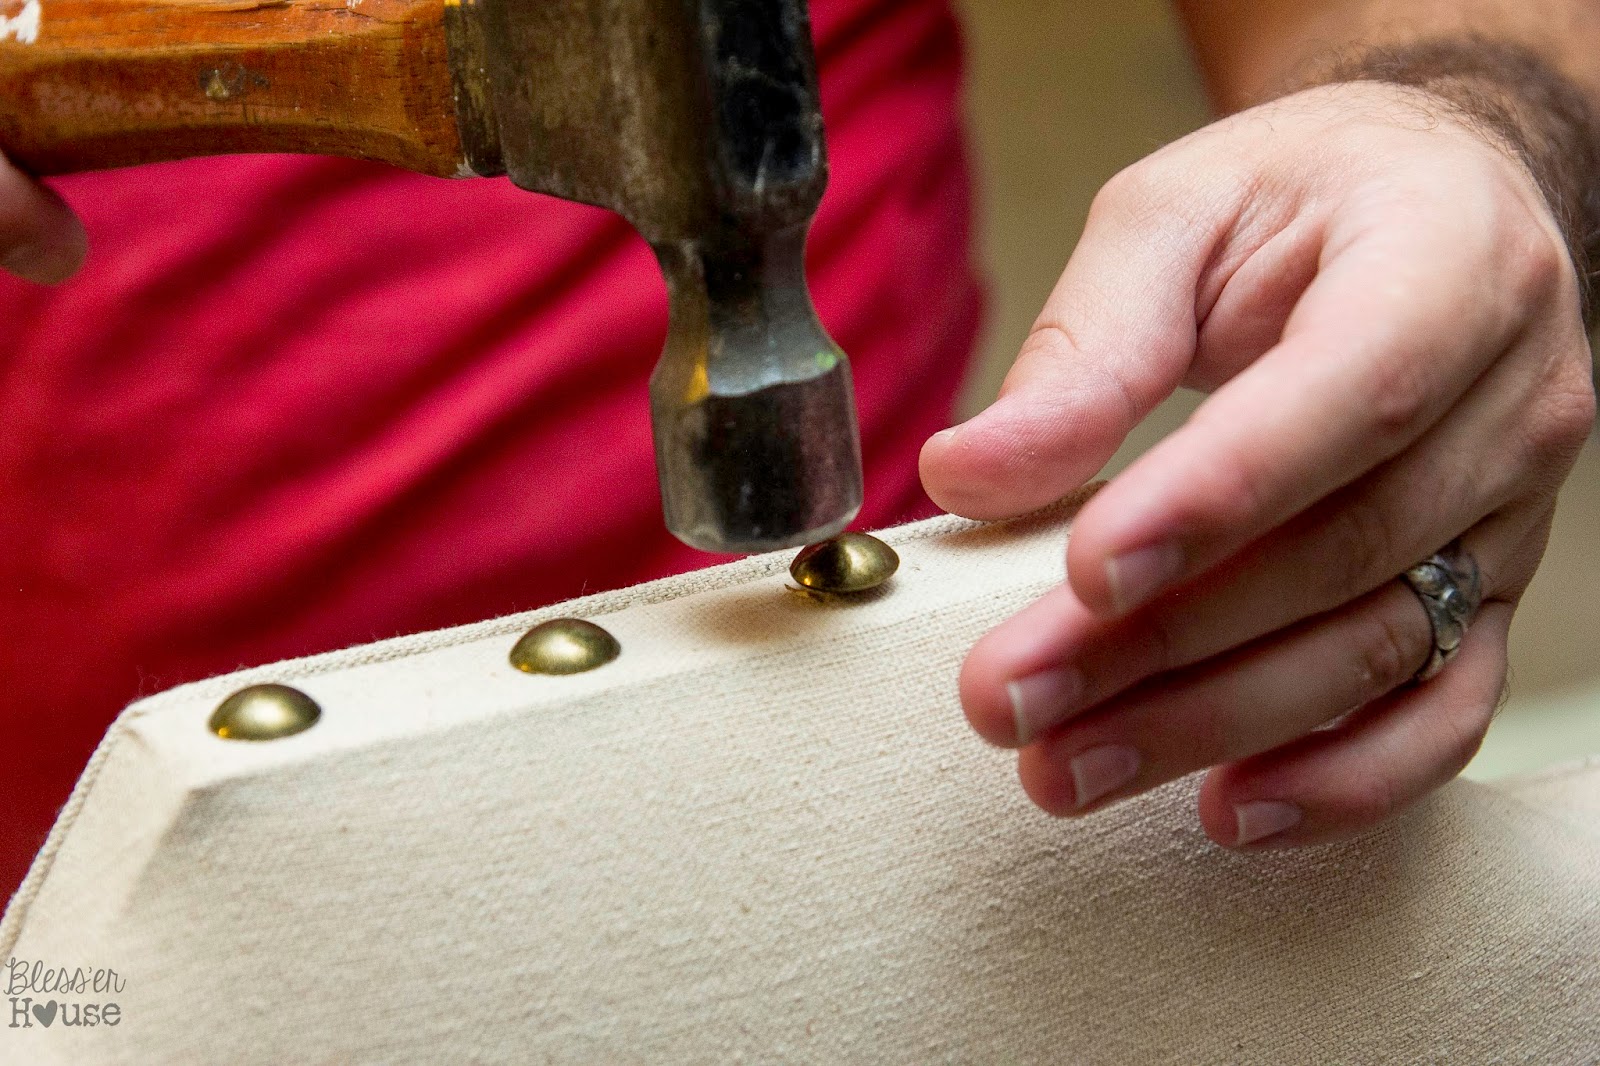
Then, we hammered away on the nailheads.

Bless'er House | Restoration Hardware Knock Off No Sew Dining Chairs

Lucky for us, my parents and grandmother offered to take Olivia on an outing while we knocked out this project.  But she got to help for the last step. :)

Bless'er House | Restoration Hardware Knock Off No Sew Dining Chairs

She insisted on handing the nailheads to her daddy the entire time.

Bless'er House | Restoration Hardware Knock Off No Sew Dining Chairs

And that was it!

Bless'er House | Restoration Hardware Knock Off No Sew Dining Chairs

It's definitely not perfect, and I have a lot of learning to do in the upholstery department, like how to wield a needle and thread for once.  But I'm so proud of how it turned out.  

So now my dining room is looking a little more furnished.

Bless'er House | Restoration Hardware Knock Off No Sew Dining Chairs

2 chairs down and 4 more to go.  The rest have arms so those will be a little more tricky.  The goal is to have them all finished by Thanksgiving so our family can fill them. :)

I still can't believe how far we came on this project.


What do you think?  Convincing?  

If you're a Restoration Hardware junkie like me too, here are a few more: (Just click the image to find the post.)

Bless'er House | DIY Oversized Vintage Irish Map Restoration Hardware KnockOff

DIY Industrial Pendant Light: Bless'er House

I think I have an addiction. ;)

Blessings,


Follow me on
Or find me on 

Kamis, 06 November 2014

Craft Frenzy Friday #65


CFF-Title

Welcome to Craft Frenzy Friday!  

We love to see your crafts, recipes, DIY projects, and much more!  We will pin every link to our Pinterest board every week.  The people featured will additionally get pinned onto our featured board!  We hope that you will share your blogs with us!


We want to thank everyone for joining us at Craft Frenzy Friday and hope that you will follow our hosts!


Come link us all on Facebook!

 
giveaway
The winner of our November Giveaway winner was Crissie!  She has been emailed and has 48 hours to reply or we will pick another winner!
This month our Giveaway is Two Key Fobs from DeBoop Shop!  They have such a fun shop with awesome products!  Make sure to check them out here:
a Rafflecopter giveaway
CFFRules
CFFRules-3
CFFFeatures

cff65-2

If you were featured be sure to grab our button and spread the word!
 
Craft Frenzy Friday Feature
<div class="Craft Frenzy Friday Feature" style="width: 150px; margin: 0 auto;"> <a href="http://www.craftdictator.com/category/craft-frenzy-friday/" rel="nofollow"> <img src="http://craftdictator.com/wp-content/uploads/2014/01/CFFButtonFeature.jpgg" alt="Craft Frenzy Friday Feature" width="150" height="150" /> </a> </div>
 
Even if you weren't featured make sure to Grab our other Craft Frenzy Friday Button!
Craft Frenzy Friday
<div class="Craft Frenzy Friday Feature" style="width: 150px; margin: 0 auto;"> <a href="http://www.craftdictator.com/category/craft-frenzy-friday/" rel="nofollow"> <img src="http://craftdictator.com/wp-content/uploads/2014/01/CFFbutton.jpg" alt="Craft Frenzy Friday" width="150" height="150" /> </a> </div>
CFFParty
 
**Please note: By linking to this blog party, you are giving us permission to use your photos and content as part of the weekly features if selected.**
We also pin all of our features on the Craft Frenzy Friday Featured Pinterest board!  All other post will be pinned onto our Craft Frenzy Friday board each week!
If you would like to be on the Craft Frenzy Friday mailing list please sign up below.  If you have participated in past weeks you are already included in this mailing list.  You will only get emails when CFF goes live!

-->

Rabu, 05 November 2014

Repurposed Curtain Panel to Grain Sack Table Runner

When I was about 8 years old and I visited my grandparents, which was quite often, they had one movie I was obsessed with in their collection that I always popped into the VCR to sing along with at the top of my lungs (not very well but I tried): The Sound of Music.

I loved Julie Andrews.  I was captivated by her.  And in that one part when she fashioned the Von Trapp children's playclothes out of drapes, I thought she was absolutely brilliant. (She totally did it herself.  No screen writing or movie costume department or anything.)

So when trying to get creative with some old curtain panels I had lying around, I was so excited to figure out how I could put them to good use for Thanksgiving this year.

Bless'er House | Repurposed Curtain Panel to Grain Sack Table Runner

I don't have 7 children to clothe or anything (Thank God!), but I will have 3 or 4 plain tables to do a little something with.  I just didn't want to spend anything to beautify them.  

So I resorted to going Fraulein Maria on a few plain cotton curtain panels sitting in storage just waiting for the perfect project.  

First rule of decorating on the cheap: never throw out scrap fabric or wood. Second rule of decorating on the cheap: never even talk about throwing out scrap fabric or wood.

(Impossible to reference The Sound of Music and Fight Club in the same post? Checkmate, my friend.)

Bless'er House | Repurposed Curtain Panel to Grain Sack Table Runner

Here is all I needed:
  • Curtain panel
  • Scissors
  • Pins
  • Hot glue gun and glue sticks
  • Iron
  • Painter's tape
  • Craft paint
  • Sponge brush or large artist brush
 And, thankfully, I already had all of it in my craft stash.  Free projects rock!

All I had to do was cut off the tabs of the curtain panel.

Bless'er House | Repurposed Curtain Panel to Grain Sack Table Runner

And I cut the panel right down the middle to be 16 inches wide.  If the panels were longer I would have put them over a bare window, which our upstairs is still sporting from moving in, but they were only 6 feet long.  I'm a floor to ceiling curtain kinda gal.

Bless'er House | Repurposed Curtain Panel to Grain Sack Table Runner

From here, I followed my tried and true no-sew curtain method.  I have a serious needle and thread phobia...a sewing machine makes me run screaming.  Since three of the seams were already there, I only had to pin under the one raw edge.

Bless'er House | Repurposed Curtain Panel to Grain Sack Table Runner

(Pardon my photos here.  I wrapped up this project after dark...curses, Daylight Savings Time!)

I ironed the pinned "seam" first to get a nice, crisp edge.  Then, removing one pin at a time, I swiped on a line of hot glue under the seam.

Bless'er House | Repurposed Curtain Panel to Grain Sack Table Runner

I wanted to try out a French grain sack look, so I used painter's tape to create a stencil for stripes.

Bless'er House | Repurposed Curtain Panel to Grain Sack Table Runner

Then, I just pounced on top of the taped fabric with a sponge brush.  I stuck with red so that I could use the runners for fall and on through Christmas.

Bless'er House | Repurposed Curtain Panel to Grain Sack Table Runner

Once the paint was dry, and I peeled up the tape, that was it!  Really easy and it would have been much faster if I didn't have a toddler under foot.  She even helped with painting the stripes and spacey me forgot to snap a photo.  It was way too cute to handle. ;)

Bless'er House | Repurposed Curtain Panel to Grain Sack Table Runner

I have a couple more to make, but the great thing is one panel can make two table runners, so none of the fabric goes to waste.

I'm loving how it turned out for yesterday's Dollar Store Thanksgiving Tablescape.  My efforts to keep our decor at costing next to nothing almost seems pathetic...almost.  

Bless'er House | Repurposed Curtain Panel to Grain Sack Table Runner

And hey, if a two year-old could handle it, there's nothing stopping you.  

Blessings,


Follow me on
Or find me on 

Selasa, 04 November 2014

Dollar Store Thanksgiving Tablescape

Just in case you hadn't noticed...I'm a tweaker. 

That's not to be confused with a twerker.  Miley Cyrus pretty much owns that title.  And that's definitely not a good look for me anyway.  

No, I tweak.  As in I study decor, and I research the cheapest way to achieve it.  And then in the midst of my madness to execute it for myself, I usually stare and nit-pick at whatever project I'm obsessed with in the moment for a good hour or two...thank goodness my toddler is an awesome napper.  (Dear Lord, I hope I didn't just seal my fate with those famous-last-words.)

Bless'er House | Dollar Store Thanksgiving Tablescape

You want to know a secret?  9 times out of 10, no scratch that, 10 times out of 10 I have no flippin' clue what I'm doing in decor-world.  I'd never actually attempted a real tablescape until today.  

But Robert and I had a temporary moment of insanity decided last week to have a huge Griswold-style Thanksgiving this year.  I'm so crazy excited since this is the first Thanksgiving we'll be hosting EVER!  (Thanksgivings in our newlywed 700 square-foot first apartment didn't make the cut in the past.)

Bless'er House | Dollar Store Thanksgiving Tablescape

But since we're living on a one salary income while I do this stay-at-home mom gig, I didn't want to spend an arm and a leg on table decor...cuz for real...stuffing my face is way more important.

After whipping up a DIYed table runner (which I'll share with you tomorrow), reusing items we had around our house, and scouring the dollar store, this was the end result.  I gotta say...I'm pleased as punch.

Here are some ideas to keep the Thanksgiving table decor as low budget as possible:

1. Use nature to your advantage.

Leaves, pinecones, and wood slices add tons of texture to a table.  And, hey, it's free!  

I used some leftover wood slices from our faux fireplace door, and they worked perfectly as candle holders.  Pinecones doubled as placecard holders.  And, since we don't have any big trees in our little yard, I found leaves in the floral section of the dollar store to scatter on the table.

Bless'er House | Dollar Store Thanksgiving Tablescape

2.  Use dollar store candles to create a big impact for a low cost.

When I was little, my grandparents would light candles at the dinner table for special occasions.  It was considered "fancy" and my brother and I worked extra hard to focus on our table manners when they were lit.  

There's still something special about lit candles on a table.  And, if you're a pyro like I am, it's fun to watch the flame if the conversation is slow. ;)

Bless'er House | Dollar Store Thanksgiving Tablescape

3.  Create placemats using posterboard and a metallic marker.

We don't really have the tradition of taking turns around the table to discuss what we're thankful for because to be honest, we're not that formal.  We're very lucky to have a family that gets along really well and laughter inevitably fills our kitchen at every gathering.  I love it!

But there's something beautiful about writing what you're thankful for.  Counting blessings always puts life into perspective...even if it's on a placemat.

Bless'er House | Dollar Store Thanksgiving Tablescape

4. Paint plastic dollar store pumpkins.

Okay, you don't have to paint them.  But the pumpkins I bought at my local dollar store weren't convincing as the real thing.  See?  I tweak.  It's a sickness.  But I love the little bit of elegance the white creates.

Bless'er House | Dollar Store Thanksgiving Tablescape

By the way, do you see that light above our table?  I just bought a fixer-upper chandelier from Goodwill this morning that is destined to take its place.  You'll be seeing it eventually.

Bless'er House | Dollar Store Thanksgiving Tablescape

And do you see that one candle out of line with the rest?  Did I just give myself away?  Do you think I'm crazy now?  I warned you. ;)

Bless'er House | Dollar Store Thanksgiving Tablescape

Bless'er House | Dollar Store Thanksgiving Tablescape

For our "napkins" I cut up a roll of burlap I had in my craft closet.


Those scalloped red salad plates were actually a Goodwill find a few months ago for $1 each.  They'll probably make another appearance at Christmas.


So what do you think?  Decent for a first try at tablescaping?  I think I'm even more excited about how cheap it was than than actual decor itself.  The dollar store is freaking fabulous!


Since I didn't get a chance to share yesterday, we snapped this quick picture before trick-or-treating Friday night.  Olivia wore out those ruby slippers of hers.  After hitting up the first house for candy, she was hooked!


Be sure to check out yesterday's giveaway for $100 to Freestyle Mom!  I'm not ready to admit that Christmas is right around the corner but this shop is really getting me in the holiday spirit.  I might end up a tad jealous of the winner.

If you're already getting started on Christmas shopping, I just discovered Raise.com for buying discounted gift cards and selling unwanted ones for cash.  Friend to friend, I had to share.  It's pretty brilliant. ;)

Blessings,


Follow me on
Or find me on 

Senin, 03 November 2014

Giveaway: Freestyle Mom

Happy Monday, friends!  And if it's not a very happy Monday for you, I hope this will brighten your mood.  

If you're new to this little blog, I sometimes get in the giving mood.  Since Halloween is behind us and Christmas is quickly approaching (less than 8 weeks away!), you might be seeing more of it.  I wanted to give back to all of you who take the time to read about my DIY adventures...and sometimes insanity.  You are the reason I stay motivated on projects for our home.  So thank you!

The other day I was gearing up to get my Christmas spirit on by looking around Etsy, and I stumbled upon this lovely shop, Freestyle Mom.  It is chock full of wood working crafts for weddings, home decor, and holiday gifts, and every item is beautiful!  I'd take any of it in a heartbeat for my own house.  Tinley Innes, the shop owner, has been super sweet to host a giveaway for $100 to her shop!  

Take a look around Freestyle Mom and enter through the Rafflecopter widget below along with a comment of your favorite item from the shop. (Eligibility in the United States, Canada, and Australia.) The winner will be announced next week.


a Rafflecopter giveaway

Want to promote your business and get in the giving mood?  I'm happy to work with you!  Find out more details at Advertise on Bless'er House.

Blessings,


Follow me on
Or find me on