Tampilkan postingan dengan label Knock Off. Tampilkan semua postingan

Senin, 10 November 2014

Knock Off No Sew Dining Chairs

I thought this day would NEVER come.  If there has ever been a post where I wanted to do cartwheels across my front yard from revealing the "after" of a challenging makeover, this would be it.  

I have a tendency to bite off more than I can chew.  I see a fixer upper project, my wheels start turning with ideas to make it something amazing, I hit a major snag, I realize that my dreams often exceed my abilities, and I end up shoving it to the bottom of my to-do pile in my garage never to see the light of day again.  (Am I alone in this?  Please tell me you have a when-I-get-the-nerve pile too.)  

But y'all.  Oh my GOSH, I am so ecstatic to show you that my abilities finally caught up to my wild DIY-driven imagination...this time at least.  So I'll save you the time of scrolling to the bottom of this post to see the final reveal:


Just so you know where this big undertaking started, this was how it looked before my upholstery-inexperienced self could get a hold of it.


Well hello, Harvest Gold.  Haven't seen you in a while.  

When I first started envisioning what I wanted in our still very bare dining room, I kept coming back to the same criteria in dining chairs- light linen/canvas, statement-making nailhead trim, and interesting weathered oak legs.  

This one from Restoration Hardware was an absolute dream:

Restoration Hardware Baroque Upholstered Side Chair- $449

And this one from Pottery Barn:

Pottery Barn Calais Chair $349

And this one from Ballard Designs:

Capistrano Dining Chairs - Set of 2
Ballard Designs Capistrano Dining Chair- $429

But there was one minor little problem.  There was no way on God's green earth that my stay-at-home-mom one-income household could shell out $2400 for a set of 6 chairs.  So I swooned and dreamed until I stumbled upon these babies for $20 each on Craigslist. (Which was all the way back in March and then sat in my garage as I tried and failed at this project multiple times.)


They needed some lovin' and a good bit of updating, and they looked nothing like my inspirations.  But they had good bones.  I simply couldn't walk away from them.  So my wonderful dad, who has worked in the furniture business for over 30 years, made the trek with me to pick them up.  

Not only did they have good bones, they were made by American Drew, a very high quality company, and they were incredibly sturdy.  Huge plus!

So here is what we used for our big chair overhaul:
  • Jigsaw
  • Pneumatic staple gun
  • Mouse sander
  • Electric drill
  • Kilz primer
  • Valspar paint in Montpelier Ashlar Gray (flat)
  • Minwax stain in Dark Walnut
  • Several rags
  • 2 1/2" paint brush
  • Sponge brush
  • Mattress egg crate foam 
  • Blue Hawk canvas drop cloth 
  • Spray upholstery adhesive
  • Scissors
  • Staples
  • Sharpie marker
  • Medium sized cardboard box from Lowe's
  • Hot glue gun and glue sticks
  • DAP Contact Cement
  • Dritz Home 5/8 inch nailheads in antique gold
  • Tape measure
  • Pencil
Thankfully, I had a lot of the supplies already on hand in my workshop and could borrow the staple gun.  In the end, I only had to pay for the nailheads, drop cloth, spray adhesive, cardboard, and egg crate foam.  

My final cost: $40 per chair! (Craigslist cost included)  
Even without having a lot of the supplies, it's still a bargain.  My entire set of 6 chairs combined cost way less than even 1 Pottery Barn chair.

Here's what we did:

Since I wanted to upholster the entire backs of the chairs, I knew the curves were going to be tricky.  So Robert and I cut off the finials first.


Bless'er House | Restoration Hardware Knock Off No Sew Dining Chairs

From there, my father-in-law, the woodworking master, gave us a few pointers, and we decided to cut straight edges marked with a level.

Bless'er House | Restoration Hardware Knock Off No Sew Dining Chairs

We avoided cutting into the caning.

Bless'er House | Restoration Hardware Knock Off No Sew Dining Chairs

Then ran the jigsaw over the straight marks.

Bless'er House | Restoration Hardware Knock Off No Sew Dining Chairs

We sanded the edges down for good measure.  (Side note: I love this hardworking man.)

Bless'er House | Restoration Hardware Knock Off No Sew Dining Chairs

Yay! No more tricky curvy top!  From there, I primed the bottom half of the chairs.

Bless'er House | Restoration Hardware Knock Off No Sew Dining Chairs

Then I painted on two coats of Valspar Montpelier Ashlar Gray.

Bless'er House | Restoration Hardware Knock Off No Sew Dining Chairs

Once the paint was dry, I used a sponge brush to put on a coat of the stain.  I let the stain sit for about 10 minutes before wiping it off with a rag, and I worked in sections.

Bless'er House | Restoration Hardware Knock Off No Sew Dining Chairs

And I was left with this rich wood tone with just enough gray peeking through to give it that weathered look.  The wood grain texture on these chairs are amazing!

Bless'er House | Restoration Hardware Knock Off No Sew Dining Chairs

Once the chairs were dried, this was where the hard part began.

By the way, mattress foam toppers are way cheaper than specialty upholstery batting.  And so so comfy!

Bless'er House | Restoration Hardware Knock Off No Sew Dining Chairs

We went ahead and traced the back of the chair onto a piece of cardboard with a Sharpie.  (I promise I did way more work than stand around taking pictures of Robert.)

Bless'er House | Restoration Hardware Knock Off No Sew Dining Chairs

And cut out the traced shape.

Bless'er House | Restoration Hardware Knock Off No Sew Dining Chairs

Using the cardboard as a template, I traced the egg crate foam as the batting.

Bless'er House | Restoration Hardware Knock Off No Sew Dining Chairs

And cut it out with scissors.

Bless'er House | Restoration Hardware Knock Off No Sew Dining Chairs

Then we sprayed the front of the chairback with upholstery adhesive.

Bless'er House | Restoration Hardware Knock Off No Sew Dining Chairs

We pressed the batting onto the adhered chairback.

Bless'er House | Restoration Hardware Knock Off No Sew Dining Chairs

And it was ready for fabric!  (We stapled the drop cloth fabric to the seat while the chairs dried before.)

Bless'er House | Restoration Hardware Knock Off No Sew Dining Chairs

To decide on the amount of drop cloth fabric we needed, we measured the width and height of the chairback and added 4 inches all around to be on the safe side.  Our chairs were 16"x28", so we marked the fabric to be 24"x36" for the front piece.  

Bless'er House | Restoration Hardware Knock Off No Sew Dining Chairs

And cut them out.

Bless'er House | Restoration Hardware Knock Off No Sew Dining Chairs

To create a panel for the back of the chairs, we used the cardboard template and traced around it, leaving an allowance of about 2 inches.  We put these back fabric pieces aside for later.

Bless'er House | Restoration Hardware Knock Off No Sew Dining Chairs

Once we started positioning the front piece of the fabric, it took some time to work with.  We started by stapling the bottom center first.

Bless'er House | Restoration Hardware Knock Off No Sew Dining Chairs

For the sides, I started by folding the bottom flap under to make it straight and stapled it around to the back of the chair.

Bless'er House | Restoration Hardware Knock Off No Sew Dining Chairs

This was definitely a two-person job.  As we worked our way up to staple the sides, I stretched the fabric up while Robert pulled the fabric tightly around the side and stapled, making sure the front was smooth with no puckering.

Bless'er House | Restoration Hardware Knock Off No Sew Dining Chairs

Tricky stuff, I tell ya but it worked.

Bless'er House | Restoration Hardware Knock Off No Sew Dining Chairs

At the top, I was thanking my lucky stars that we went with cutting straight edges.  We started on the sides by folding the corners and cut a little at any places we needed to pull more tightly.  

Bless'er House | Restoration Hardware Knock Off No Sew Dining Chairs

And then we breathed a sigh of relief because the hard part was done!

We went over the staples with a hammer and cut off any excess fabric on the back.

Bless'er House | Restoration Hardware Knock Off No Sew Dining Chairs

To make a back panel, I hot glued the edges of the cardboard cut-out and pulled the fabric tightly, starting at the bottom.

Bless'er House | Restoration Hardware Knock Off No Sew Dining Chairs

For the top I cut the corners and pulled them to glue down.

Bless'er House | Restoration Hardware Knock Off No Sew Dining Chairs

The edges of the panel and the stapled edges of the back of the chair got a good brushing of contact cement.

Bless'er House | Restoration Hardware Knock Off No Sew Dining Chairs

After waiting about 10 minutes, I pressed the panel to the back of the chair.  I applied hot glue under the edges too.

Bless'er House | Restoration Hardware Knock Off No Sew Dining Chairs

Hey, look! An upholstered chair!  Not bad for someone who is making this up as she goes along.  I pressed out the wrinkles afterward too (this photo was a dead giveaway that it needed it).

Bless'er House | Restoration Hardware Knock Off No Sew Dining Chairs

For the nailheads, we used a tape measure and a pencil to mark every 1.75 inches.

Bless'er House | Restoration Hardware Knock Off No Sew Dining Chairs

Since the wood of these chairs was so hard, we had to use a small drill bit first.
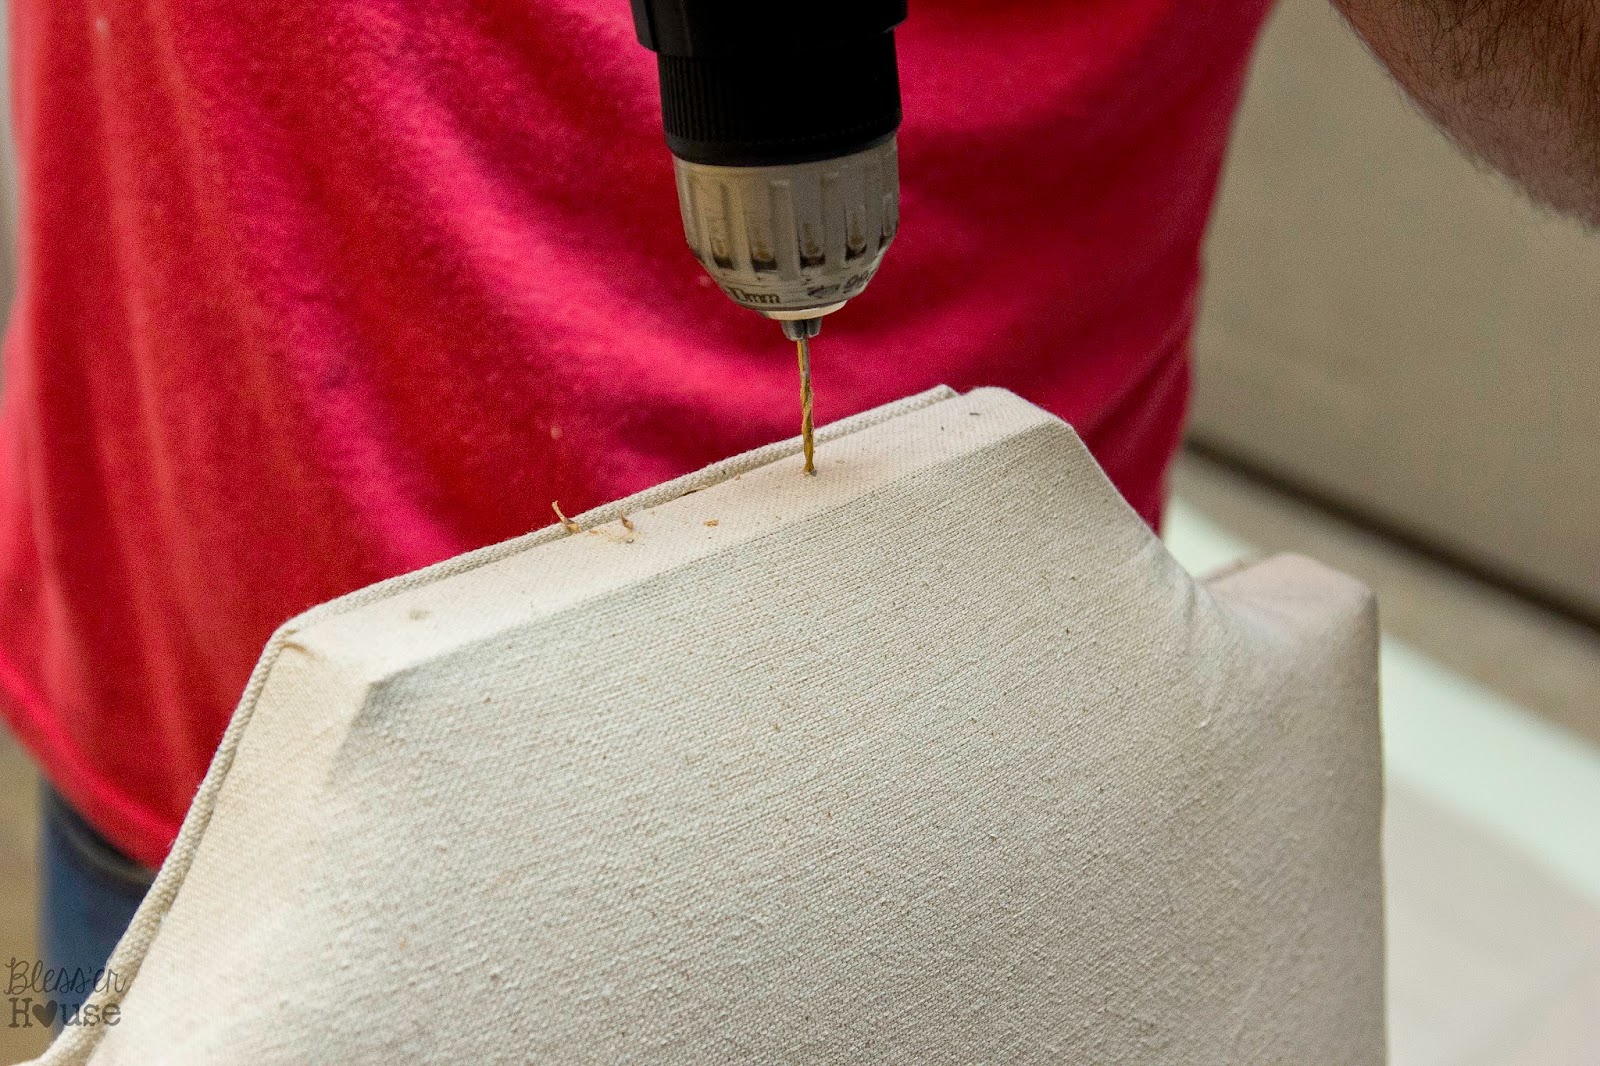
Bless'er House | Restoration Hardware Knock Off No Sew Dining Chairs

Then, we hammered away on the nailheads.
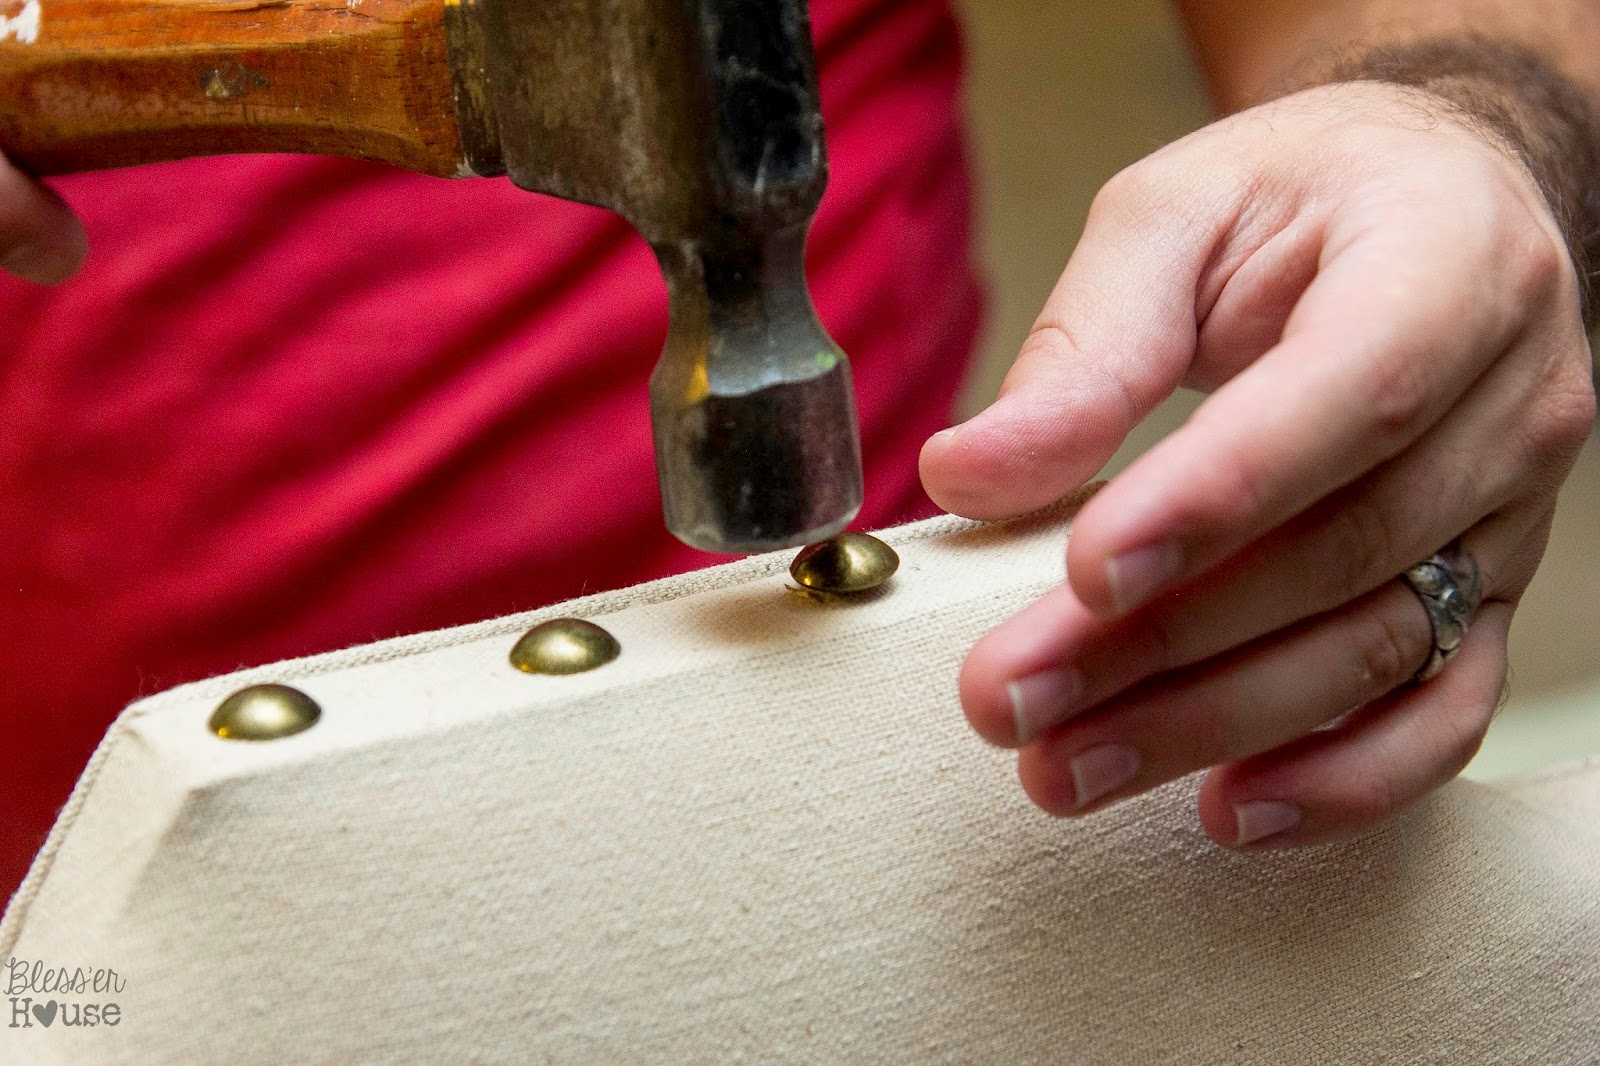
Bless'er House | Restoration Hardware Knock Off No Sew Dining Chairs

Lucky for us, my parents and grandmother offered to take Olivia on an outing while we knocked out this project.  But she got to help for the last step. :)

Bless'er House | Restoration Hardware Knock Off No Sew Dining Chairs

She insisted on handing the nailheads to her daddy the entire time.

Bless'er House | Restoration Hardware Knock Off No Sew Dining Chairs

And that was it!

Bless'er House | Restoration Hardware Knock Off No Sew Dining Chairs

It's definitely not perfect, and I have a lot of learning to do in the upholstery department, like how to wield a needle and thread for once.  But I'm so proud of how it turned out.  

So now my dining room is looking a little more furnished.

Bless'er House | Restoration Hardware Knock Off No Sew Dining Chairs

2 chairs down and 4 more to go.  The rest have arms so those will be a little more tricky.  The goal is to have them all finished by Thanksgiving so our family can fill them. :)

I still can't believe how far we came on this project.


What do you think?  Convincing?  

If you're a Restoration Hardware junkie like me too, here are a few more: (Just click the image to find the post.)

Bless'er House | DIY Oversized Vintage Irish Map Restoration Hardware KnockOff

DIY Industrial Pendant Light: Bless'er House

I think I have an addiction. ;)

Blessings,



Follow me on
Or find me on 

Selasa, 28 Oktober 2014

DIY Oversized Vintage Map

I don't know if I've mentioned this before, but I married a Leprechaun.  I'm talkin' does a jig around the house when the mood strikes him, randomly impersonates a thick Irish accent when telling a joke, and, truth be told, is a tad on the short side.  Ahem. I mean he's the same height as me, so not short at all.  That's usually his argument. ;)

From the time I first met my hubby's family 5 years ago, they made it abundantly clear just how proud of their Irish heritage they are.  And I gotta say, I love it!  In everything that's Irish, God and family come first, and every day can be made better with a bit of Irish spirit.  It's more than ancestral roots; it's a state of mind.

Bless'er House | DIY Oversized Vintage Irish Map Restoration Hardware KnockOff

So even though we are proud to be American, bringing in a bit of Irish heritage to our home was a lot of fun.  And creating an oversized map of old Ireland seemed like the perfect way to personalize our living room.

Hold onto your hat and run for the hills because it required a few computer tricks. (Eek!)  But even if you're like me and haven't sprung for Photoshop software and are a bit technologically challenged, I have no doubt that you can do this one.

Here's what you'll need:
  • 1 piece of plywood (later cut to the approximate size of your map)
  • Wood stain (I used Rustoleum Weathered Gray)
  • Brown paint (optional)
  • Several sheets of parchment paper
  • A computer and laser printer
  • Mod Podge
  • Sponge brush and/or small paint brush
  • Scissors
  • A pen or pencil

Here's what you do:

1.  Save snapshot pieces of a zoomable map.

Whatever sort of map you decide to use, there are tons of resources online where you can find zoomable maps.  The Library of Congress and Map History are great places to start.  Just be careful not to use one that is copyright restricted.


Once you find the perfect map, zoom in (because zoomable will work best) and capture a snapshot of a portion of the map image.  (PC users, you can do this using the Snipping Tool under your Start Menu.)

Continue capturing snapshots and saving each image as pieces of your map.  The snapshots should be as close in size with each other as possible.


2. Piece together snapshots in Picmonkey like a puzzle.
Once you have saved all of the snapshots you need of your map, go to Picmonkey.com, hover over the tab that says Design, and click the size of the canvas you need.  I chose 8x10.


Once you've opened a blank canvas in Picmonkey, click the Overlays tab on the far left toolbar (the one shaped like a butterfly).


In the Overlays toolbar, click Your Own at the top to open the folder where you saved your map snapshots.


Okay, I know.  You're probaby wondering why on earth would I tell you to take snapshot pieces of a map, just to piece them back together again.  By taking snapshot pieces and putting them back together in Picmonkey, you are creating a higher resolution file.  If you had simply saved the original map image as a whole, you would end up with a very grainy, pixelated map.

Taking apart the map and putting it back together creates a sharp, crisp image that can be blown up to large sizes.  Technology is super annoying but amazing at the same time, isn't it?


On your canvas, place and resize one snapshot at a time and piece them together like a puzzle as you continue to use the Overlay uploading tool.  I pieced together one side and the top of the map to make sure my length and width were the right size for the 8x10 canvas.


After you've adjusted for the length and width, you can click the Combine All Image Elements icon at the top of the page to prevent any pieces from moving around as you place more pieces.

Once your map is all pieced together, save in as large of a format as possible.  Picmonkey calls it "Sean", which is the highest resolution file option.

If the file is larger than 1 MB, resize it to be just under that size.  My file ended up being 995 KB.

3.  Upload into Block Posters and print.
I had a hard time figuring out this part without having the capability of Photoshop, but this website was a lifesaver.  BlockPosters.com allows you to upload an image and print a poster by dissecting the image into equal parts and creating a PDF.  It might sound complicated, but just hang with me for a sec.


On the home screen of the Block Posters website, upload the finished map you saved from Picmonkey.  If the image is larger than 1 MB, you'll need to resize it to just under that size.


Here's where you need to adjust the poster size of your image and determine what paper size you're using in your printer.  I needed my map to be about 24" wide and 36" tall, so I chose portrait orientation at 3 letter sized pages wide.


Once your poster size is configured, download the image and print.

4. Cut, place, and glue your printed map.
When the map finished printing, I double checked the size by laying out the pages and measuring.  

Super sweet hubby, Robert, cut a piece of plywood to slightly bigger than the map size.  

I stained the plywood piece using Rustoleum Weathered Gray.  An hour later, I dry-brushed the edges using a bit of leftover dark brown craft paint.

Bless'er House | DIY Oversized Vintage Irish Map Restoration Hardware KnockOff

Then, I tested out the placement of my map so I could determine how much plywood I should leave showing as the frame.  (That below shot there helped me see that I needed to pull the map pieces down about an inch.)

Bless'er House | DIY Oversized Vintage Irish Map Restoration Hardware KnockOff

From there, I cut any margins on the pages that would overlap.

Bless'er House | DIY Oversized Vintage Irish Map Restoration Hardware KnockOff

Concentrating on one page at a time, I marked each page's placement.

Bless'er House | DIY Oversized Vintage Irish Map Restoration Hardware KnockOff

I brushed on a layer of Mod Podge where I had marked the page and used the placement marking to position and smooth the page onto the plywood.  I used an old credit card as sort of a squeegee to smooth out any bubbles as I went.

Then, I repeated the same position, mark, paste, place method on the rest of the map pages.

Bless'er House | DIY Oversized Vintage Irish Map Restoration Hardware KnockOff

And voila!  Up close, I can see a few lines but they're hardly noticeable.  And it sure beats the pants off of the Restoration Hardware oversized maps that cost about $1,000.  Plus, RH doesn't have an Irish map as an option.

Bless'er House | DIY Oversized Vintage Irish Map Restoration Hardware KnockOff

My in-laws visited Ireland recently, and brought back this Gaelic plate.  It translates to "A Thousand Welcomes".  Robert got the idea to screw it into the top of the map, and it's perfect!

Bless'er House | DIY Oversized Vintage Irish Map Restoration Hardware KnockOff

So now the lower wall of our stairway isn't looking so naked anymore.  

Bless'er House | DIY Oversized Vintage Irish Map Restoration Hardware KnockOff

And you know what Robert did when I showed the map to him after it was finished?  A good ol' Irish jig.  I have to admit, I danced along too. :)

I'll have to figure out a way to weave in some of my Swedish heritage in our home next.  

So even though it seems weird that I'm saying this the week of Halloween: Peace, love, and shamrocks, friends!  

And lots of Irish blessings,


Follow me on
Or find me on