Kamis, 08 Januari 2015

Your Turn To Shine Link Party #13


Welcome back!  After a two week break for Christmas and New Years, I am so excited to see what you guys have been up to!  The hubby and I spent lots of time with our families, who thankfully live close by, and we had the best time ever this year.  Christmas seems to get better and better the older our little one gets.

But I'm so ready to get back into a routine again.  If you're new to linking up with YTTS, your posts will be seen from five different blogs.  And we are so happy you're here!  Show us what you've got, and you might be featured next week.

I had a hard time picking my favorites this week because there were some gorgeous furniture makeovers!  So I featured them all.  Maybe it's because I have a few furniture makeovers of my own going on right now, and I'm dying to show them to you.


We would love to connect with you on social media!  
Vicki & Amy from Canary Street Crafts  ||  Facebook  || Instagram  || Pinterest  ||  Twitter  ||  Google+
Jamie from anderson + grant  ||  Facebook  ||  Instagram  ||  Pinterest  ||  Twitter  
Kendra from Joy In Our Home  ||  Facebook  ||  Instagram  ||  Pinterest 
Nicole from Meet The B's  ||  Facebook  ||  Pinterest  ||  Twitter  ||  Google+
Lauren from Bless'er House  ||  Facebook  ||  Instagram  ||  Pinterest  ||  Twitter   ||  Google+

And don't forget to check out the Your Turn To Shine Pinterest Board, where all our features will be pinned!


featuresYTTS features week 13
Amy & Vicki’s pick: Triple Chocolate Cookies from Simply Suzanne’s At Home
Nicole’s pick: Quick and Easy Peppermint Mocha from Home Remedies Rx
Lauren’s pick: Old Dresser Turns Coffee Table from Lake Girl Paints
Jamie’s pick: Hot Cocoa Bar from DIY Beautify
Kendra’s pick: Rich Holiday Fruit Bread from Yesterfood

hostess feature

Hostess Picks:

I love this Old Dresser Turned Coffee Table by Lake Girl Paints!  I've never had the nerve to cut up a piece of furniture into something completely new, but this one makes me want to try it.


I could live in Heather's Guest Room from The Heathered Nest for days.  I'd probably just lay in that comfy looking bed and stare at that gorgeous ceiling the whole time.


Mary Beth shared a round up of her Favorite Furniture Projects for 2014, and they are all stunners!  But I think this black secretary is my favorite.


I can't get over the detail on this desk makeover by Clockwork Interiors.  Cynthia madeover the chair that goes with it too, and it's a beauty.


If you were featured, don't forget to grab a button!  

YTTSfeatureBH  YTTSbuttonw:5hosts


partyrules
  1. No Etsy stores, giveaways, or link parties.
  2. Please link to a specific post on your blog, not your blog's home page.
  3. Link back to one of our blogs with a text link or party button.
  4. By submitting a link, you're giving us permission to feature your project on our blogs and on social media.  Proper credit and a link back to your post will always be given.  
  5. Each week, a few of our favorites will be featured on all four of our blogs.  Features will also be pinned to our Pinterest Party Board  for even more exposure!  If you were featured, be sure to grab a button! 
 Thank you so much for stopping by and for linking up with us!


Rabu, 07 Januari 2015

The Most Frugal Way to Organize a Pantry (+ Free Printable)

Cheers to accomplishing New Year's resolutions in the first week of January!  Huzzah!  

We won't harp on the fact that the rest of my house is an utter trainwreck right now.  But, hey, the pantry is organized, so the rest of this place doesn't even matter.  

I thought this would be a fast process, and I would have this thing done by last night.  Ha!  I wish.  But our pantry is finally in order, and I gotta say, I love how cheap it was almost as much as I love the final look.  Whatever you do, do not spend $500 on food storage containers because I found three much cheaper options.


Okay, y'all, can we stop for a second and appreciate how far this space has come?  Excuse me while I cringe in shame.


It physically pains me that I'm even showing you these before shots right now.  Having a toddler who explores all of the shelves in her reach, being on-the-go most days, and having those obnoxious builder grade wire shelves that make every box of food fall over was a disasterous combination.


I couldn't even think anymore.  And I've noticed that my mood changes along with the clutter in our house.  If we have hit a disorganized state, I'm stressed out to the max.  

So I emptied that entire pantry, and said goodbye to my countertops for the day.  My entire kitchen was covered in food containers.  


I honestly had wanted to organize our pantry for a long time, but the price of my "vision" was pretty steep.  After doing my homework and finding that even the cheapest pantry storage options in Walmart were at least $5 per container, I resolved to finding something more budget-friendly.

(Yes, y'all.  I'm cheaper than Walmart.  Hey, I take it as a compliment.)

So here ya go- 3 cheap pantry storage options:

1.  Wrap cardboard boxes in pretty paper or fabric with labels.  I collected diaper boxes for a few months with this plan in mind, and they work perfectly!  The only cost was the $8 roll of paper I used. You can see my DIY pantry crates from yesterday's post.

Bless'er House | The Cheapest Way to Organize a Pantry + Free Printable

They look pretty snazzy for only $8 for 10 big pantry boxes.

Bless'er House | The Cheapest Way to Organize a Pantry + Free Printable

2.  Use Dollar Store Containers.  So those handy clear containers there...did not cost me $5-$10 a pop.  I found them at the dollar store!  (Dollar Tree to be exact if you live in the U.S.)

I bought 8 tubs and 10 containers with pourable spouts.  I cut out labels with black cardstock I had lying around, labeled them with a white chalk marker, and taped them on.  I could have gotten fancy with printed labels, but I kept it simple.

I'm not totally sure these are air tight, but they are doing awesome so far.  And they're much more air tight than the store containers all of the food was in before anyway.

Bless'er House | The Cheapest Way to Organize a Pantry + Free Printable

3.  Shop your home for baskets and bins.  I sort of have a basket addiction.  They come in handy a lot around our house, so when I needed a little more food storage, I put a couple of baskets from our living room to good use.  They were only holding clutter anyway, which forced me to organize that little bit too.  Win win!

While searching our house for other baskets, I found a couple of wire ones to hold my cook books and Lola's pet supplies too.  And I repurposed a galvanized bucket sitting on a bookshelf that served a better purpose as a potato bin.

Bless'er House | The Cheapest Way to Organize a Pantry + Free Printable

I keep walking by the pantry and find myself just staring at it in awe.  How many people can say that, right?  Actually, don't answer that.  I'm probably just weird.

Bless'er House | The Cheapest Way to Organize a Pantry + Free Printable

I happened to already have those glass containers from earlier last year when I first attempted the pantry organization process and sort of lost my steam.  They're great in here too though.  I bought them at Walmart last summer.


Bless'er House | The Cheapest Way to Organize a Pantry + Free Printable

I resolved to create a pantry inventory list to hang on the wall in here too.  I usually have a running list in my head of things I need to buy when we run out, but I never fail to forget at least one item every week.  

I'm hoping this solves that dilemma.

Bless'er House | The Cheapest Way to Organize a Pantry + Free Printable

And maybe I won't have to spend as much time writing out my grocery shopping list each week.  

Bless'er House | The Cheapest Way to Organize a Pantry + Free Printable

You can print the pantry inventory list for yourself here:


In the end, here's how much our entire pantry makeover cost:

Paper Wrapped Diaper Boxes     $8.00
Dollar Store Plastic Containers   $18.00
Can Dispenser Containers           $18.00  ($6 each from Walmart)
Repurposed Baskets and Jars       $0.00

Total cost:  $44.00

Now the trick is to actually keep this place organized.  We'll see how that goes.  

If you liked this organizing post, be sure to check out these too:

(Just click the image to go to the post.)


Do you have any frugal organizing tips for the pantry?  Or even other parts of the house?  Or at least strategies to keep a toddler from rearranging shelves?  There might not be any hope for that one.  Good thing she's cute. ;)

Blessings,


Follow me on
Or find me on 
Selasa, 06 Januari 2015

DIY Weathered Wood Pantry Crates for Cheap

In all my life, I've only attempted yoga once.  

One of my best friends convinved me to try it with her, and y'all, this wasn't beginners' yoga.  This was "let's take our legs and throw them around our neck like a scarf" kind of yoga with heaters running full blast in a tiny mat-covered room.  

I wanted to die.  And I kid you not, I passed out. Ha!  So embarassing.  I was so zen that I was basically unconscious on the floor.  But I've been told by so many that I should try it again...maybe with better hydrating beforehand.

I used to be the same way with organizing.  I'd stand in front of a crammed closet, feeling so overwhelmed that I'd completely shut down halfway through.  It's frustrating trying to break my pack rat ways.  Until I figured out how to use my pack-ratness to actually get organized.  How's that for irony?

Bless'er House | DIY Weathered Wood Pantry Crates for Cheap

There are those wonderfully organized people out there who will happily drop hundreds of dollars on a pretty organization system.  I am not one of those people.  (I'd rather buy shoes, honestly.)  

But for months now, I had an idea to start stock-piling diaper boxes to use them for our pantry that was desperately crying out for some help.  (Who would have thought that having a toddler would actually help me get rid of clutter?)  

Update: Check out our organized pantry here! (For under $50)

Hey, when life hands you grody diapers, make weathered wood pantry crates, right?  

I used: 
  • Empty cardboard diaper boxes (10 to be exact)
  • Faux wood printed craft paper (affiliate link)
  • Scissors
  • A Sharpie
  • A craft paint brush
  • Mod Podge
  • Black cardstock
  • Permanent chalk marker
  • Removable scrapbook adhesive strips

So I put those babies to work by cutting off the tops of the boxes first.

Bless'er House | DIY Weathered Wood Pantry Crates for Cheap

I measured the width and height of the box, then added together the measurements for the bottom, both sides, plus about 8 extra inches.  (Mine came to 40 inches.)

I had found the perfect faux wood print craft paper at Hobby Lobby for around $8 and just knew it was destined for greatness.  I cut the width of paper I needed for my first box.

Bless'er House | DIY Weathered Wood Pantry Crates for Cheap

And using a ruler, I drew lines for my template on the white side.

Bless'er House | DIY Weathered Wood Pantry Crates for Cheap

I drew about a 2-3 inch diagonal line from each corner of the box and cut it all out to create four flaps.

Bless'er House | DIY Weathered Wood Pantry Crates for Cheap

To glue on the first flap, I brushed some Mod Podge on the perimeter of the front of the box, attached the paper to it, and smoothed it out.

Bless'er House | DIY Weathered Wood Pantry Crates for Cheap

For the inside, I cut the paper at a diagonal at the top two corners of the box and folded the edges in...

Bless'er House | DIY Weathered Wood Pantry Crates for Cheap

...Mod Podged the top inside of the box...

Bless'er House | DIY Weathered Wood Pantry Crates for Cheap

And smoothed the paper down.

Bless'er House | DIY Weathered Wood Pantry Crates for Cheap

For the outside, I glued down the excess edges too.  Then repeated the process on the other side of the box.

Bless'er House | DIY Weathered Wood Pantry Crates for Cheap

For the last two sides, I folded the paper edges in for the corners of the box.

Bless'er House | DIY Weathered Wood Pantry Crates for Cheap

Then Mod Podged again.  And that was it!  Do you see that huge pile of boxes back there?  Sheesh!  What was I thinking?  But, hey I can't complain too much.  It's basically free, pretty pantry storage. 

In person, they really are convincing as real wood crates.  Somehow they look more fake in pictures.

Bless'er House | DIY Weathered Wood Pantry Crates for Cheap

For "chalkboard" labels, I just folded black card stock in half, cut, and glued on with removable adhesive strips.  I like that they're removable so if I choose to relabel them later, I can do it without messing up the faux wood paper.

Bless'er House | DIY Weathered Wood Pantry Crates for Cheap

I'd thought about buying real wood crates or even the cheaper ones from Walmart to stain myself, but even those are around $15 a piece plus the materials needed to fancy them up.  For 10 crates, that's over $150!

I'll stick with my free storage, thanks.

At the moment, my kitchen is in complete chaos mode while I organize our pantry, but it really needs to be done.  You'll be seeing more of that tomorrow along with a few organization tips. (Cheers for sticking to New Years goals!)

Bless'er House | DIY Weathered Wood Pantry Crates for Cheap

I'm finally getting this organizing thing figured out, and I'm realizing it's like yoga for the brain (or at least I'm assuming).  I can think so much clearer without all of the clutter.  And it makes we wonder if I should give yoga another go...without the passing out part.  ;)

Namaste,


Follow me on
Or find me on 

Senin, 05 Januari 2015

10 Budget Tutorials to Add Farmhouse Character to a Builder Grade House

I don't know if I ever told y'all this, but I'm related to a celebrity.

Okay, he's not really a celebrity.  More like he works with celebrities.

Okay, you caught me.  More like he puts camera tracks together, runs tools between rigging sets, and sometimes has to do some paprazzi control, but I'm super proud of my "little" brother who works as a grip in the film industry.  And, hey, he has a page on IMDB, so that's sorta celeb-worthy, right?

He and my sister-in-law just wrapped season 5 of filming The Walking Dead.  I'm always enthralled with the stories they tell about all of the work that happens behind the scenes.  It's so cool, but holy schnikies, it is a ton of work to film even one episode.  But to them, after all of the blood, sweat, and tears, seeing the end result is even more fulfilling.


And that made me realize the same thing about the gorgeous houses I always drool over on Pinterest.  I sometimes forget how much hard work behind the scenes went into creating those beautiful farmhouses...maybe with less zombie blood than my brother deals with though.

But I'm determined, y'all!  I want that farmhouse in my head.  We're getting there, but we have a ways to go.  It really all comes down to creating classic architecture in this white builder box of ours.

So, for over a year, I've been collecting the easiest, most budget-friendly, and most beautiful DIY tutorials I could find for creating farmhouse character in a builder grade house.  Hey, I wouldn't be a good gal pal if I didn't share them with you guys.

*Be sure to pin the following images from their original sources to give these talented ladies the credit they deserve.

1.  How to Make a Farmhouse Window with Moulding by Funky Junk Interiors

This tutorial is the easiest one I've found, no confusing diagonal cuts needed.


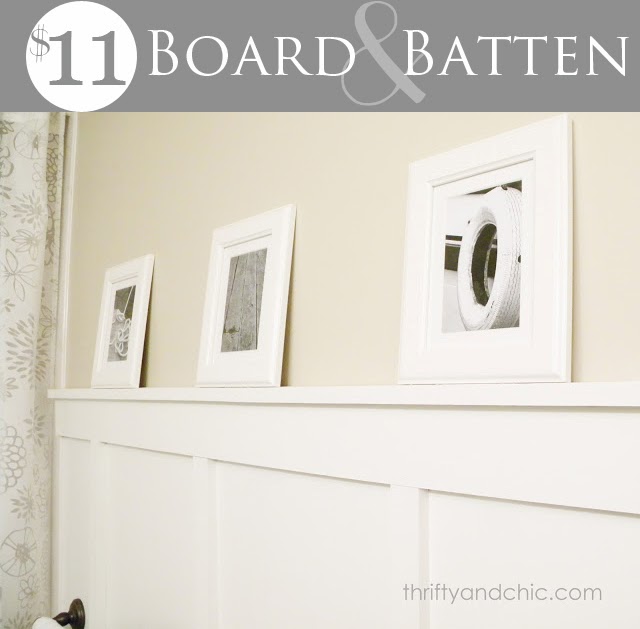
2.  Cheap and Chic Board and Batten by Thrifty and Chic

I have searched high and low for the absolute cheapest way to create board and batten, and this one was the winner.  $11 for an entire bathroom?  I'm sold.


3.  Creating Faux Wood Beams by The White Buffalo Styling Company

This DIY can be accomplished with just framing lumber from the hardware store- so much more budget-friendly than real deal reclaimed beams!


4.  DIY Ceiling Wood Beams by Jenna Sue

I am dying to tackle this DIY!  Can you even believe it cost $200 for 3 long beams as opposed to the typical cost of several thousand?


5.  DIY Barn Door Hardware for $60 by Bright Green Door

There are lots of barn door tutorials out there, but this one is the ultimate, y'all.  It's the cheapest one I've found, and it doesn't require any fancy welding skills.  Win!


6.  DIY Wide-Plank Floor (From Plywood) by Little Green Notebook

It's only 50 cents per square foot!  Need I say more?  


7.  How to White Wash Wood (and Install Wall Planking) by Maison de Pax

I really love the whitewashing effect in this tutorial.  Can we just pause and admire this space for a second?  Wow.


8.  How to Paint Kitchen Cabinets by Cherished Bliss

I've read up on way too many painted cabinet tutorials, and I really love this method.  Since this one uses oil based primer and enamel paint, it's much more kid-friendly for cleaning lots of messes.


9.  DIY Butcher Block Countertops by DIY Cozy Home

These countertops cost just $40!  Can you even believe this blogger bought them from Ikea and refinished them?  It's brilliant.


10.  DIY Farmhouse Light by The Woodgrain Cottage

I've seen a good many farmhouse light makeovers out there, but this one is my absolute favorite.  And it costs less than $30!


It's incredible how beefing up moldings, nailing some wood on your ceilings, and painting cabinets can give a plain looking house tons of old-timey charm.  I want to do them all!  

And even though it might be easier to hire a contractor to take care of your vision of a country get-away in the suburbs, nothing compares to the pride you feel after accomplishing a wow-worthy DIY.  (The amount left in your wallet after it all is nothing to sneeze at either.)

Have you found any tutorials out there that you love too?  Have you attempted any of these before?  Are you a Walking Dead junkie too?  ;)

Blessings,


Follow me on
Or find me on 

Minggu, 04 Januari 2015

Meanwhile, Across Blogland

I think my arms have gone numb from how often I've been pinching myself lately.

Because I have three HUGE tidbits of news for y'all.  (Lauren, aren't "huge" and "tidbits" total oxymorons?)  Yeah, but just roll with it.

Here ya go.


News story #1:

Right this moment, I am guest posting over at From My Front Porch To Yours for the series "How I Found My Style Sundays".  You will be my bestest friend in the whole wide world if you pop over there, check it out, and leave me a little lovely comment.  You guys always know how to make my day with your vitual hugs.


News story #2:

I will officially be appearing in print tomorrow in Reloved Magazine!  Well, my face won't be in print but my rope chandelier will be.  And, honestly, that's way more cool.


News story #3:

This year, I will be a regular contributor on the DIY team at Remodelaholic!  Remember that faux fireplace project from the other week?  Apparently, it was a pretty big hit.  Cassity and Lorene are so amazing for inviting me along for the ride in 2015.  Keep an eye out there this month for my first contributor post.

Is your head spinning yet?  Mine is.  Someone needs to tie my feet to the ground because I'm floating.  I truly owe so many of the blessings I have in this glorified hobby of mine to each of you.  You make it all possible.

So stop in to From My Front Porch To Yours, pick up a copy of Reloved Magazine, follow Remodelaholic, and keep on popping in to check on my shananigans.  I guess I'll stop pinching myself now.  This must be real!

Blessings,


Follow me on
Or find me on